Netgear EX3110 Setup, LED Lights, Placement, Login & Reset
Official sources used for this guide
- NETGEAR EX3110 support and downloads
- NETGEAR: Set up a WiFi range extender
- NETGEAR: Troubleshoot access to mywifiext.net
Menus, LEDs and supported features vary by model and firmware. Check the model label and current manufacturer documentation before changing settings.
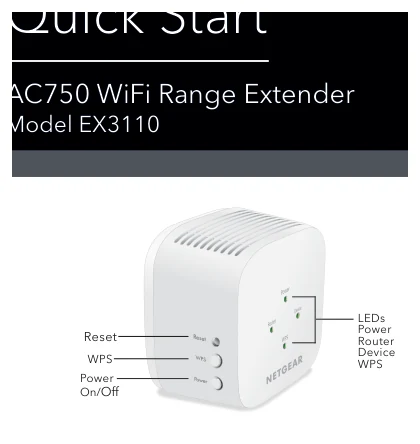
EX3110 is an AC750 wall-plug extender whose quick-start guide is built around LED-guided placement. The Power, Router, Device and WPS indicators tell you whether the unit is ready, how strong the router link is, and whether a client is too far from the extender.
1. Netgear EX3110 Overview
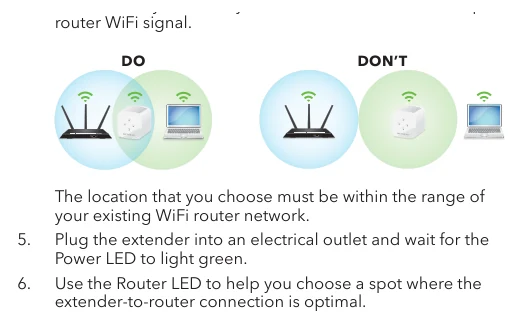
The EX3110 page is intentionally centred on placement and LED interpretation. During initial setup the extender stays in the same room as the router; only after pairing is it moved toward the weak-signal area. Green or amber Router and Device LEDs are the practical target, while red means the relevant link needs less distance.
2. Netgear EX3110 setup Guide
Start in the same room as the router. For WPS, press the extender WPS button until its WPS LED blinks and press WPS on the router within two minutes. If the router supports 5 GHz, repeat pairing for that band. Browser setup is the alternative: join NETGEAR_EXT, open mywifiext.net and follow the installation assistant.
3. EX3110 Placement LEDs & FastLane Behaviour
The EX3110 page is intentionally centred on placement and LED interpretation. During initial setup the extender stays in the same room as the router; only after pairing is it moved toward the weak-signal area. Green or amber Router and Device LEDs are the practical target, while red means the relevant link needs less distance.
| Feature | EX3110 detail |
|---|---|
| WiFi class | AC750 |
| Primary diagnostic | Power / Router / Device / WPS LEDs |
| Setup SSID | NETGEAR_EXT |
| Extended names | _2GEXT and _5GEXT in the documented WPS flow |
| Placement | Green or amber link LEDs |
4. Netgear EX3110 Login & Local Management
After installation, connect a browser device to the EX3110 network. If router and extender use different SSIDs, open www.mywifiext.net. If they share one SSID, find the extender in the router's connected-device list and browse directly to its assigned IP address.
5. How to Reset Netgear EX3110
Use the recessed Reset control to clear the EX3110 and return it to the initial NETGEAR_EXT setup state. Allow the Power LED to finish its restart sequence before attempting a new setup.
6. Netgear EX3110 Firmware Update
Use the official EX3110 support/download workflow for firmware. When manual upload is available, sign in locally, choose the EX3110 firmware image and wait through the entire restart before reconnecting.
7. Netgear EX3110 Troubleshooting
8. EX3110 placement and band checks
Use the EX3110 link/placement indicators before changing passwords or performing a factory reset. A weak router-to-extender link can make otherwise correct setup credentials appear unreliable. If a client connects to EX3110 but Internet access fails, verify the router uplink first, then check DHCP/gateway information on the client. A connected WiFi icon only confirms the local radio association.
9. Netgear EX3110 FAQs
What is the main setup method for EX3110?
Start in the same room as the router.
How do I log in to EX3110?
After installation, connect a browser device to the EX3110 network. If router and extender use different SSIDs, open www.mywifiext.net. If they share one SSID, find the extender in the router's connected-device list and browse directly to its assigned IP address.
How do I reset EX3110?
Use the recessed Reset control to clear the EX3110 and return it to the initial NETGEAR_EXT setup state. Allow the Power LED to finish its restart sequence before attempting a new setup.
How should I update EX3110 firmware?
Use the official EX3110 support/download workflow for firmware. When manual upload is available, sign in locally, choose the EX3110 firmware image and wait through the entire restart before reconnecting.